Deploy to Render
Render ↗ (opens in a new tab) is a cloud platform that simplifies and accelerates the deployment and scaling of web applications, databases, and other services. It offers a range of features including one-click deployments, automatic scaling, support for multiple programming languages, and seamless integration with popular development tools and frameworks.
The project includes a render.yaml configuration file that outlines all the essential services required to operate the platform. This encompasses the database service, the pgbouncer service, and, lastly, the Feature Flags dashboard. This configuration has been meticulously designed to streamline the deployment process on Render, ensuring a seamless setup.
Within the configuration, we recommend the starter plans, which are paid
options. However, if you'd like to explore the platform on the free plan or
switch to another plan, you can easily adjust these settings in the
render.yaml file.
Getting started

Here are the steps to deploy the platform on Render.com:
- Fork the platform to your GitHub account.
- Log in to Render.com ↗ (opens in a new tab).
- Click the
New +button, then selectBlueprintfrom the menu. - Connect your GitHub account and choose the forked platform repository.
- Follow the on-screen instructions to set up the necessary Environment Variables and click "Apply."
- Your services will be automatically built and started. Each git push will trigger a new deployment.
Environment Variables
To ensure a successful deployment on Render, the platform requires a minimum set of environment variables. Below is the list of environment variables that you must fill in. For the complete list of Environment Variables, please refer to the Configuration Page.
| Property | Description |
|---|---|
DATABASE_URL | Connection URL to your database using PgBouncer (opens in a new tab). |
DIRECT_DATABASE_URL | Direct connection URL to the database used for migrations |
NEXTAUTH_SECRET | Used to encrypt the NextAuth.js JWT, and to hash email verification tokens. |
NEXTAUTH_URL | Set to the canonical URL of your site |
GITHUB_CLIENT_ID | Client Id generated in the OAuth App (opens in a new tab) creation |
GITHUB_CLIENT_SECRET | Client Secret generated in the OAuth App (opens in a new tab) creation |
For the NEXTAUTH_SECRET variable you can use openssl rand -base64 32 or
generate a random value (opens in a new tab).
What's next?
Begin by familiarizing yourself with the platform. Create projects, add new feature flags, invite members, and implement the feature flags in your product using our official SDKs.
Lastly, stay tuned about updates, including new features and bug fixes. To ensure your platform is always up-to-date with the latest improvements, refer to our guide on updating the platform by visiting the Updates Page.
Troubleshooting
How to Retrieve the Project URL for NEXTAUTH_URL and Github OAuth App?
If you don't have a domain yet, feel free to leave the fields below empty or use dummy information. Proceed with the deployment as usual. Once the deployment is complete, Render will generate a URL for your project.
Copy this URL and update the information in your Github ↗ (opens in a new tab) OAuth App (opens in a new tab). Next, modify the environment variables in the project settings on Render and initiate a new deployment on Render once again.
Environment Variables:
NEXTAUTH_URL
Github OAuth App (opens in a new tab) Fields:
Homepage URLAuthorization callback URL
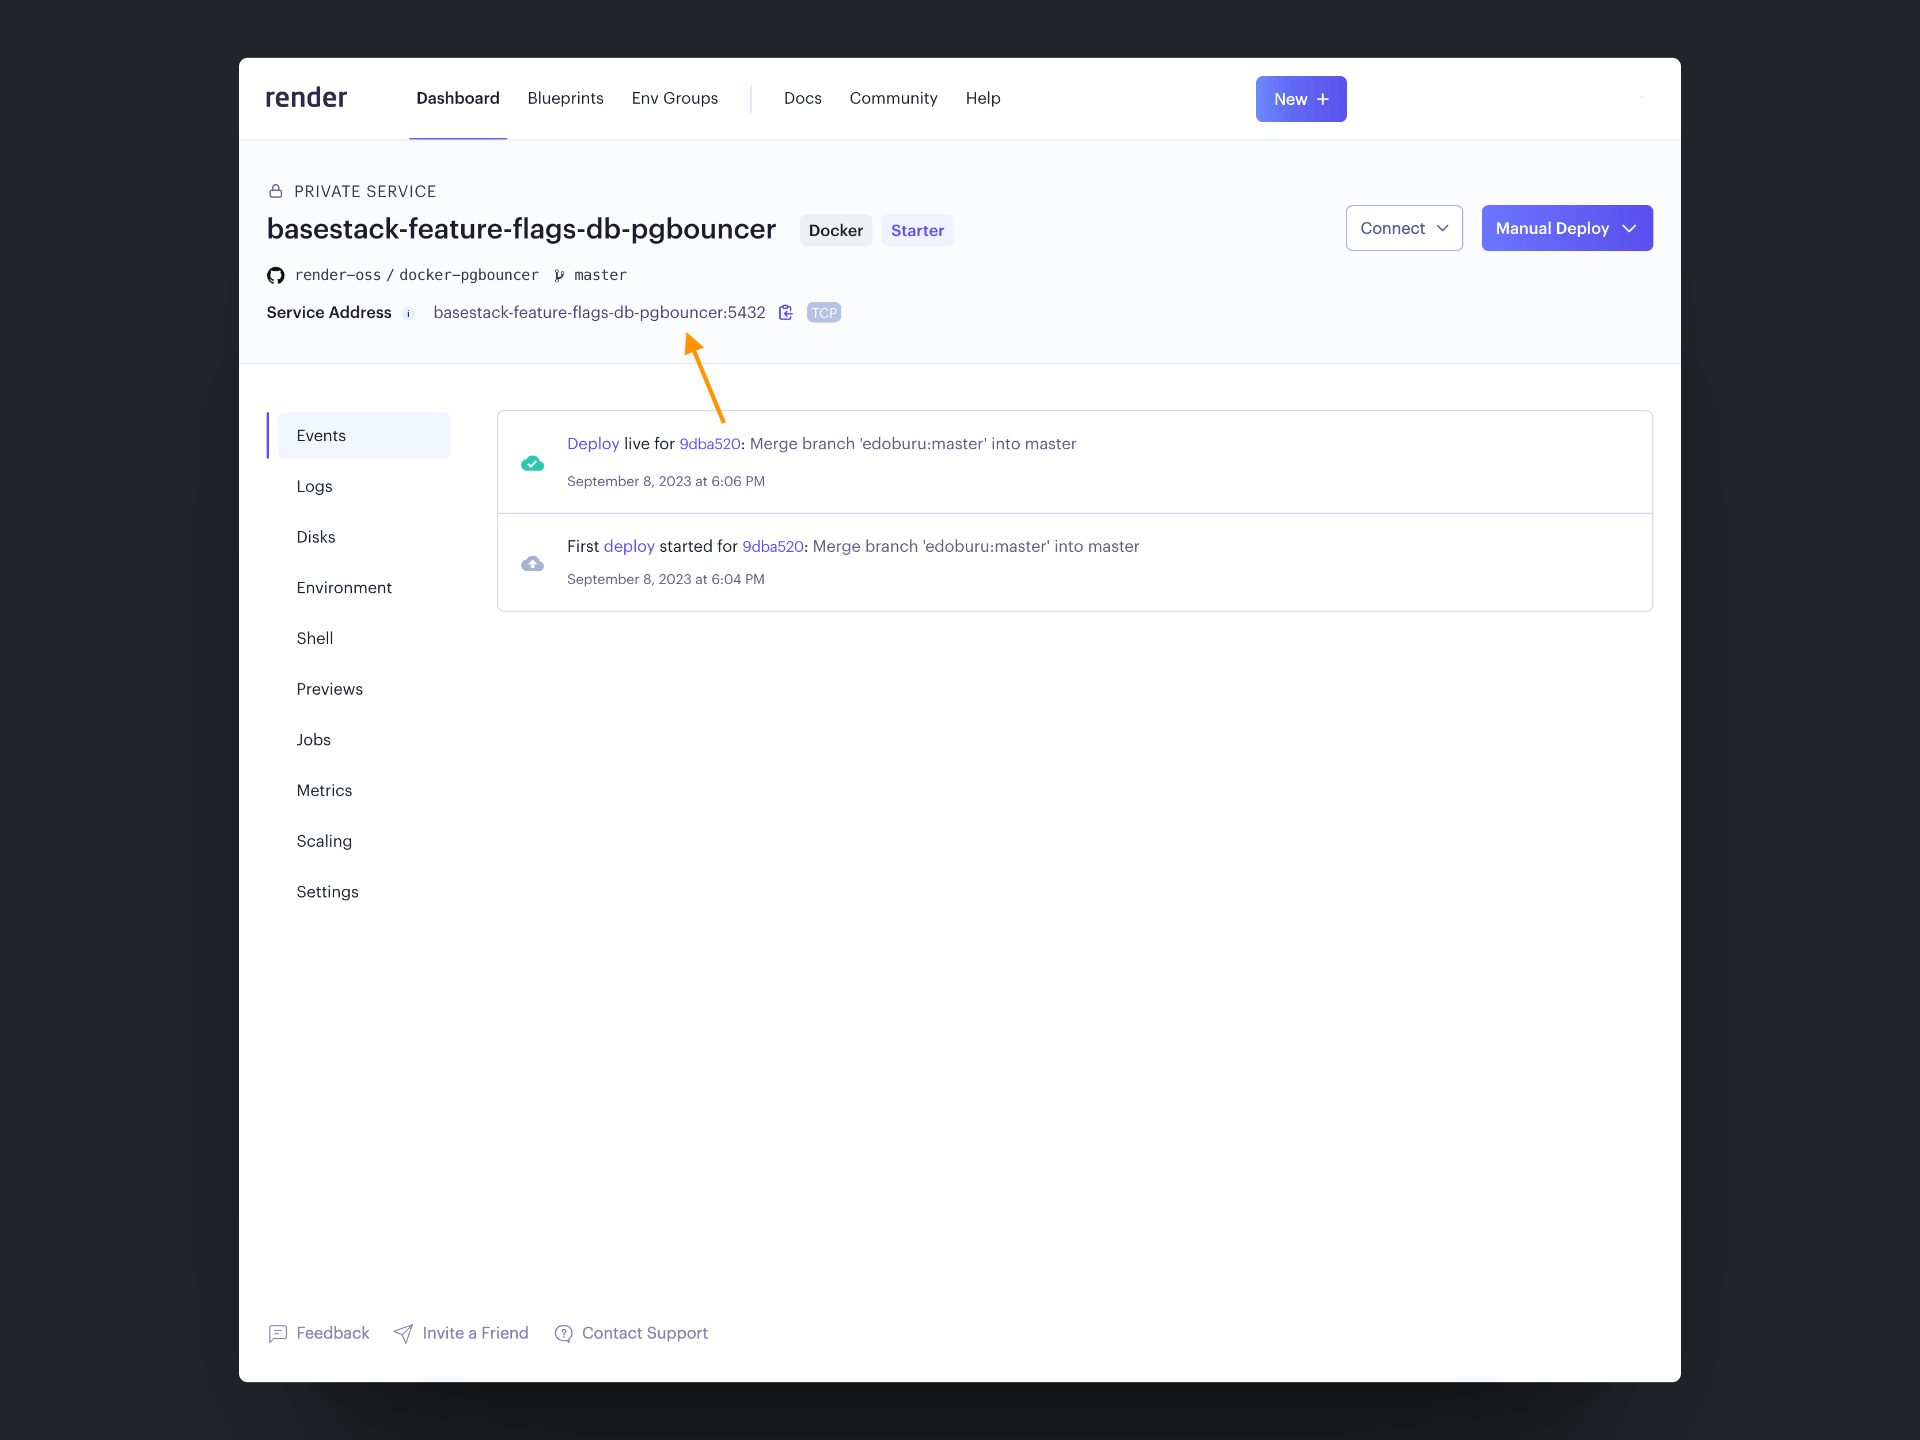
How to Retrieve the DATABASE_URL via the pgbouncer Service?
To obtain the DATABASE_URL for your applications, simply head over to the pgbouncer service. You can connect using the internal connection string, substituting the database host with the internal hostname of your PgBouncer instance: postgres://USER:PASSWORD@PGBOUNCER_HOST:PORT/DATABASE.
In the example below, we will demonstrate how to collect the following fields:
PGBOUNCER_HOSTUSERPASSWORDPORT
To build the following connection: postgres://USER:PASSWORD@PGBOUNCER_HOST:PORT/DATABASE, please follow these steps:
To initiate the connection, please access the address of the Connection Pooling service you just created. Refer to the image below to see how to copy this address, which includes the PGBOUNCER_HOST and PORT fields.
After obtaining the address, you'll need to include the USER and PASSWORD fields. Refer to the image below to see how to retrieve this information.
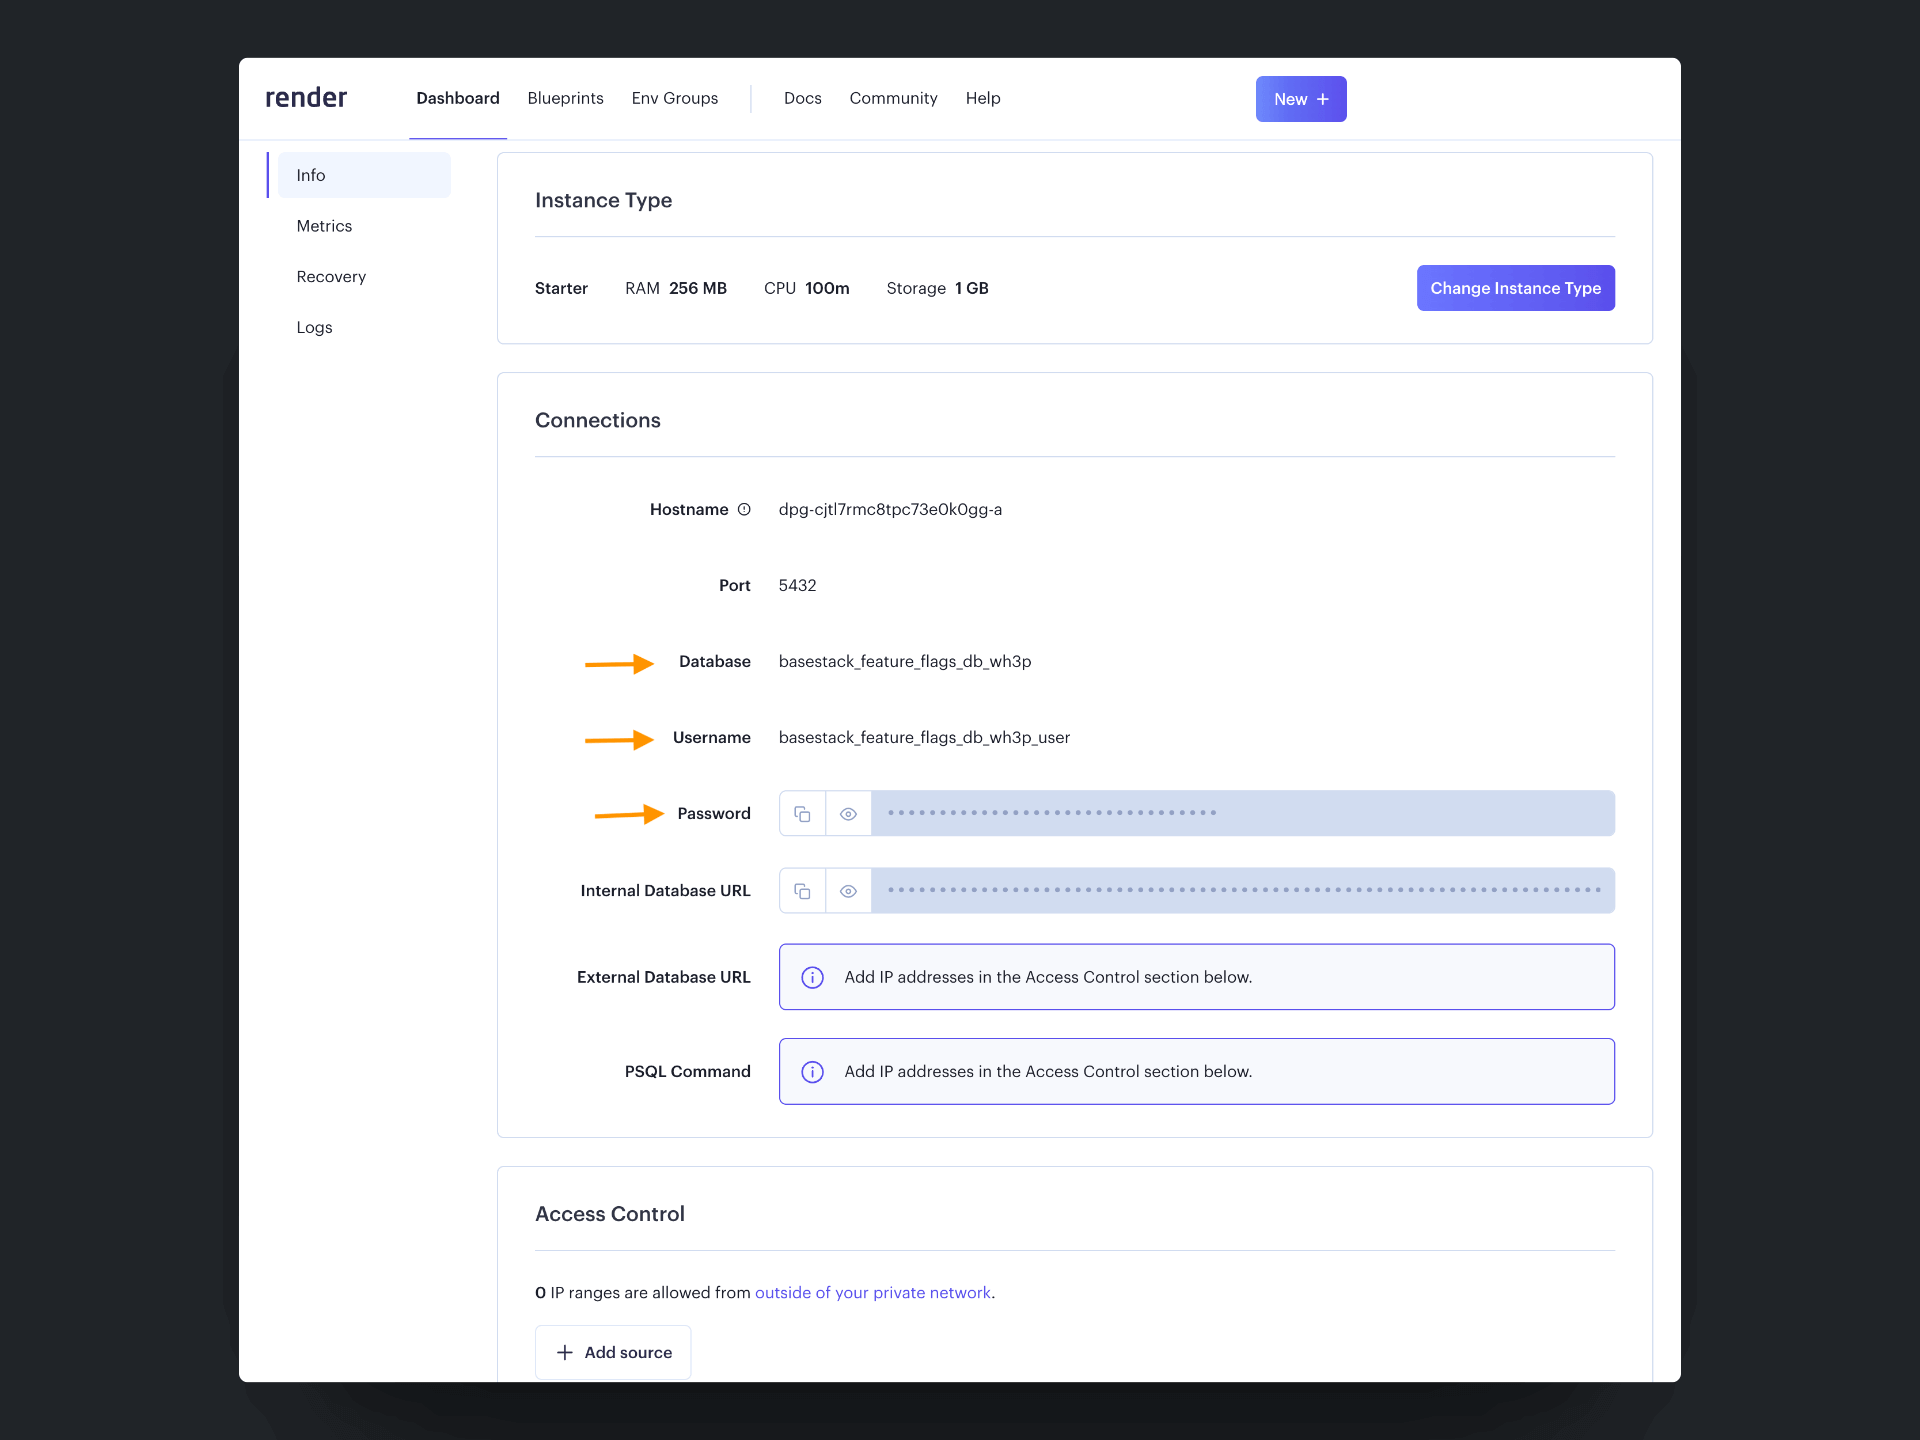
After collecting all the required information, you'll have the necessary fields to construct the connection string, which should look something like this:
The provided connection string is just an example. Please ensure you use the one you generated with your specific details.
postgres://basestack_feature_flags_db_wh3p_user:wvQf5EZ6XciDmdDSoQrp7AqCyXlq1ixc@basestack-feature-flags-db-pgbouncer:5432/basestack_feature_flags_db_wh3pFinally, copy the connection string and update the environment variables in the service running the Feature Flags dashboard instance.